The AST8300b CCD Camera Review

After some months of work and several good photos, I decided to write a field review of my new AST8300b CCD camera from Astrel Instruments. I'm an astrophotographer since the times of film imaging, and in the last years I worked with a ST10XME from SBIG, which gave me very good results. Then I started looking for a bigger sensor camera and I found the AST8300b, which uses the famous KAF8300 CCD, a well known high quality sensor with the right dimensions for me. The cameras are built by Astrel Instruments, which is an Italian company: several years ago I happened to see the very first prototype of the AST8300 in action and I was impressed. Knowing from the Astrel Instruments website that the AST8300b is since a long time no more a prototype but a commercial product, after looking at the camera specifications and some video tutorials, I decided to buy it.
A CCD camera that is not bounded to a laptop?
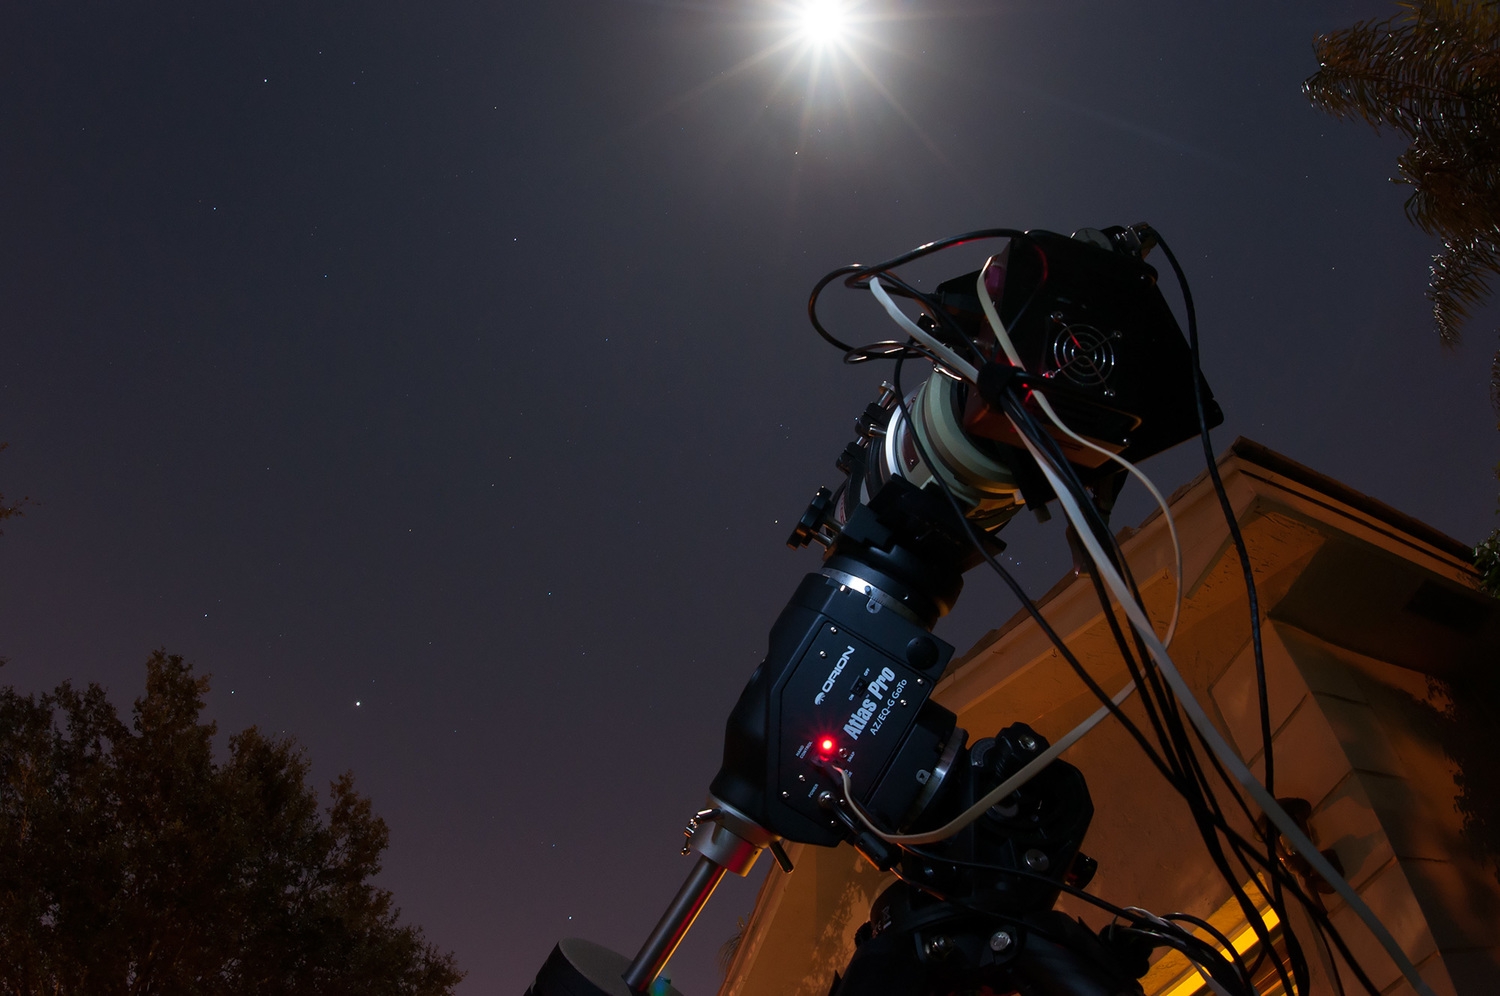
The first thing that you note when you come across this camera is its standalone vocation: the
AST8300b has a PC inside its body and so it doesn't need a laptop to be operated. It's enough to connect with your smartphone or, if you want, a PC to the WiFi network created by the camera and you're ready to go: all the software you need for your imaging session runs directly on the camera's PC, and you can see its screen and interact with it using remote desktop (just like TeamViewer) Moreover, the AST8300b has also its 5” monitor, which I did not buy, that can fit on the rear of the camera and that, together with a wireless keyboard, allows operations even without the WiFi connection.
So, buying this camera you end up having a CCD camera plus something similar to one of those mini-PC for astronomy that several vendors sell and the software: all packed inside the camera body. It looked like a good package, especially considering the price.
At the beginning I had some doubts about the software: having used for many years MaximDL with my PC, the idea to use the software suite embedded on the camera was a little scary: no ASCOM or proprietary driver for my PC applications. So I spoke about that with the Astrel team and they said that an ASCOM driver was scheduled but not yet available, and at the same time they convinced me to try to operate the camera with its own software.
I have to say that, after some time spent using the camera native apps, my doubts are gone and I never asked again about the ASCOM driver. The camera apps are very well done: simple and easy to understand at first sight, they allow me to be ready to take the frames very quickly, and you really don't need anything else to end up with a good photographic result, as I will show later. It's also worth mentioning that all the software is included in the camera price, so you don't have additional costs for software.
Currently, during my sessions, I have a mixed approach: I connect to the camera with my
smartphone when I need to be near the telescope (framing and focusing) while during the other phases I connect with my laptop. Anyway you can do everything with your smartphone, and even better with a tablet, if, for example, you don't have mains electricity and using a laptop is inconvenient because you have to carry big battery packs and inverters.
Telescope setup
Another big advantage I noticed is that the setup is really clean. Both the autoguider and the mount can be controlled directly by the AST8300b, so their USB cables can be connected to the USB ports of the camera (don't forget that there's no laptop around!), and the camera itself is controlled through WiFi connection. That means that all the cables of your setup, excluding the power supply of course, stay on the telescope and can be perfectly packed.
I don't use programs like planetarium or plate solving (I think they are available inside the camera software suite but I never tried them), so I only connect to the camera the USB cable of my trusty Lodestar autoguider and I'm ready to start.
Integrated filter wheel
The AST8300b comes with an integrated 7 positions filter wheel that also acts as a shutter. It uses unmounted 1.25” filters, so I could reuse my beautiful Astrodon LRGB set plus an Ha-OII-SII set. As the wheel is very close to the sensor, it was a pleasant surprise to be able to use filters so small with quite a large sensor like the KAF8300: even with my f/4 Newtonian there's no sign of vignetting. In addition, the back focus is only 25mm, including the wheel. At the beginning it was a bit complicated because the AST8300b did not normally mount 3mm thick filters like the Astrodon, but in Astrel they tried several different solutions and in the end they managed to find a way to properly mount my filters. I suggest, if possible, to use anyway the Astrel Instruments filters mounting service during the camera assembly: this way you receive your AST8300b with the filter wheel already populated, minimizing the risk of having dust inside.
Vacuum
The management of frosting on the sensor and optical window is solved using an interesting idea: you can attach a manual vacuum pump (included in the camera box) to a valve on the back of the chamber. Using the pump, in a few seconds you can remove the air from inside the sensor chamber, virtually eliminating any possibility of frosting. Once done, the vacuum lasts for a long time: while it is guaranteed for 2 days, in my camera it lasts for weeks, even if, to be sure, I check it every time before starting the cooling process.
AST8300b at work
After the power cable is plugged, the camera takes about 30 seconds to be ready, and you can
connect to the WiFi after a sound signal. To connect you must download and install on the
smartphone, tablet or PC, a program that communicates using a remote desktop system called VNC. There are several free apps and I have installed those recommended by Astrel since I have absolutely no experience in this field. Then choose the camera network, connect and start this software to see the AST8300b desktop on the screen:
The first thing I do, after checking the vacuum with the indicator on the pump, is to start cooling with the Cooling Control app. The only parameters to be written are the desired temperature and, if the default is not ok for you, the number of degrees per minute (I always leave the default of 5). The cooling system should allow for 42 °C below external temperature, although I never needed to go so low. Then you press start and the camera begins to cool. While the camera reaches the required temperature, I frame my target using the Find & Focus app and its liveview capability:
The liveview works just like that of a DSLR, and is very sensitive (note that when the
above was taken the exposure was 4 seconds, or 40 tenth of second as written in the app) because it works in 10x9 binning and with just a few tens of seconds of exposure you can go very deep, so you can quickly frame seeing most of the nebula that will be shown on your final photo. Thanks to my suggestion, a cross was added to the liveview marking the center of the sensor: this greatly facilitates realignment when shooting an object over several nights. The stripes under the stars are not due to blooming (the sensor is anti-blooming): they appears because the liveview continuously acquires images without closing the shutter between one exposure and the other, so during the download of the frame the light of the stars continues to hit the sensor and the brighter ones leave a trace.
Once your target is framed, you can choose a star on the liveview, which is then enlarged to focus. The app reports the FWHM and a graph of the shape of the star, allowing a quick and precise focusing.
Next step is guiding setup using the Autoguider app. It's very simple: it shows the images from the guider and a green rectangle overlapped that you have to drag over the star you want to use. Then you start the automatic calibration and, once the process is finished, you can start guiding. The app shows a graph of the accuracy of the guide and several useful statistics.
After autoguiding has started, you can setup your frames sequence using the Take Photos app. This is also very simple: for each filter you want to use among the 7 available on the wheel, you have to enter the number of frames, the exposure time and the binning. When you're ok, press Shot! and the camera starts taking the images required for all the selected filters, making the appropriate dithering between one and the other.
From this moment on, no intervention is required, so you can disconnect from the camera, which will continue to work by itself. I'd like to stress that the whole procedure is really simple, and you're able to start imaging very quickly.
One thing to know, which is perhaps not explained enough in the manuals, is that at the end of each photo, when the camera is downloading the image, the fan turns off for about thirty seconds, the WiFi connection is temporarily interrupted and the camera seems dead, so the first time it happened I thought it switched off for some reason. Then, while I was checking the cables to understand what happened, the download ended, the fan restarted, I heard the sound confirming that the photo was saved in the camera disk and everything was again normal. I asked an explanations for that in Astrel and I was told that this "temporary apparent death" is needed to minimize the noise during readout: all the electronic that is not strictly necessary to download is turned off. It remains the hassle of having to reconnect after each photo, because the WiFi is interrupted too, but, after the very first period in which I spent a lot of time controlling that everything was fine, now, once the sequence of photos, which often last hours, is launched, I reconnect only occasionally.
The flatbox controller
In my photos I always try to go as deep as possible, and it's not unusual for me to do 10-20 hours of exposure, and you know that when you try to pull out the weakest parts of an object, one of the crucial points is to have good flats, so this is a very important point for me. All full frame CCD cameras have shutters that are not very fast and not always uniform, and while this unevenness is not a problem when making long light frame exposures, it can create gradients in flats, as the exposure time is short and the shutter movements have a greater impact. Usually this effect is minimized by trying to keep the flat exposures above some seconds.
In the case of the AST8300b, the situation was even worse because the shutter is made with the 8th position of the internal filter wheel, which, having to be very precise in positioning the filters, is not very fast, and forced me to make 10-20 seconds flats to avoid gradients. That was a problem because the time required to take good flats was very long, and also because the light of the flatbox with LRGB filters was not weak enough even at the minimum intensity, forcing me to add sheets of paper to reduce it. I was quite disappointed, but luckily when I reported the problem to Astrel Instruments, I discovered that they already had the solution in beta testing, and it was a truly innovative solution: the flatbox controller. It is a box that fits into the ext2 connector of the camera and has a cable that must be attached to the flatbox instead of its power supply, so that the camera becomes the power supplier of the flatbox and can turn it on and off as needed. Then you can use the Flat Maker app, which instead of opening and closing the shutter, simply turns the flatbox on for the time required and then switch it off before downloading. Using this method, the problem of gradients on the flat generated by the shutter movements disappears altogether, and you can do very short exposures with the flatbox at maximum brightness without any problem. I must say that I am
very satisfied: I have never had such perfect flats, and I highly recommend it to all the owners of the AST8300b.
Image quality
The camera is very clean, and signal to noise is good, it did not betray the expectations I had: I think that there's no better description than the photos I've done in the last months and that I added at the end of this review.
Pros and cons
Pros:
Easy image acquisition process thanks to the camera's internal apps
Single wifi connection, very clean setup
You do not need a PC for taking pictures or controlling the guider and the mount
Very good image quality
Integrated filter wheel
Flatbox controller
Excellent customer support
Cons:
Complicated flat management if you don't use the flatbox controller (but very easy if you
use it)
Documentation is a bit weak
Even if the camera's internal applications are more than enough to work, having an ASCOM driver could reassure those already coming from the CCD world and willing to maintain their workflow, at least at the beginning.
Conclusions
The AST8300b offers a new way to do deepsky astrophotography, simpler and more immediate than using a classic camera connected via USB to the PC. I started with a bit of fear and prevention, as always happens with new tools, but I have to say that, once you have entered the philosophy of the AST8300, the work is really simplified. The setup is intuitive and simple, there is no risk that a problem with the PC or with its drivers ruins a night, and thanks to the wifi the wires around are only those needed for power supply.
The image quality is very good, the integrated 7-position filter wheel is very convenient because it allows you to mount both the RGB and narrow band filters, the camera is compact and weighs around a kilogram. The only downside are flats, which are complicated to do, but fortunately the problem is solved brilliantly by the flatbox controller, which is a fundamental accessory, with which the AST8300b is a camera that I can definitely recommend to both beginners and experienced astrophotographers.
One last positive note: customer support, very responsive and competent, always available to solve your problems.
Stefano Conti https://www.astrobin.com/users/contistefano/
Astrel Instruments http://www.astrel-instruments.com/
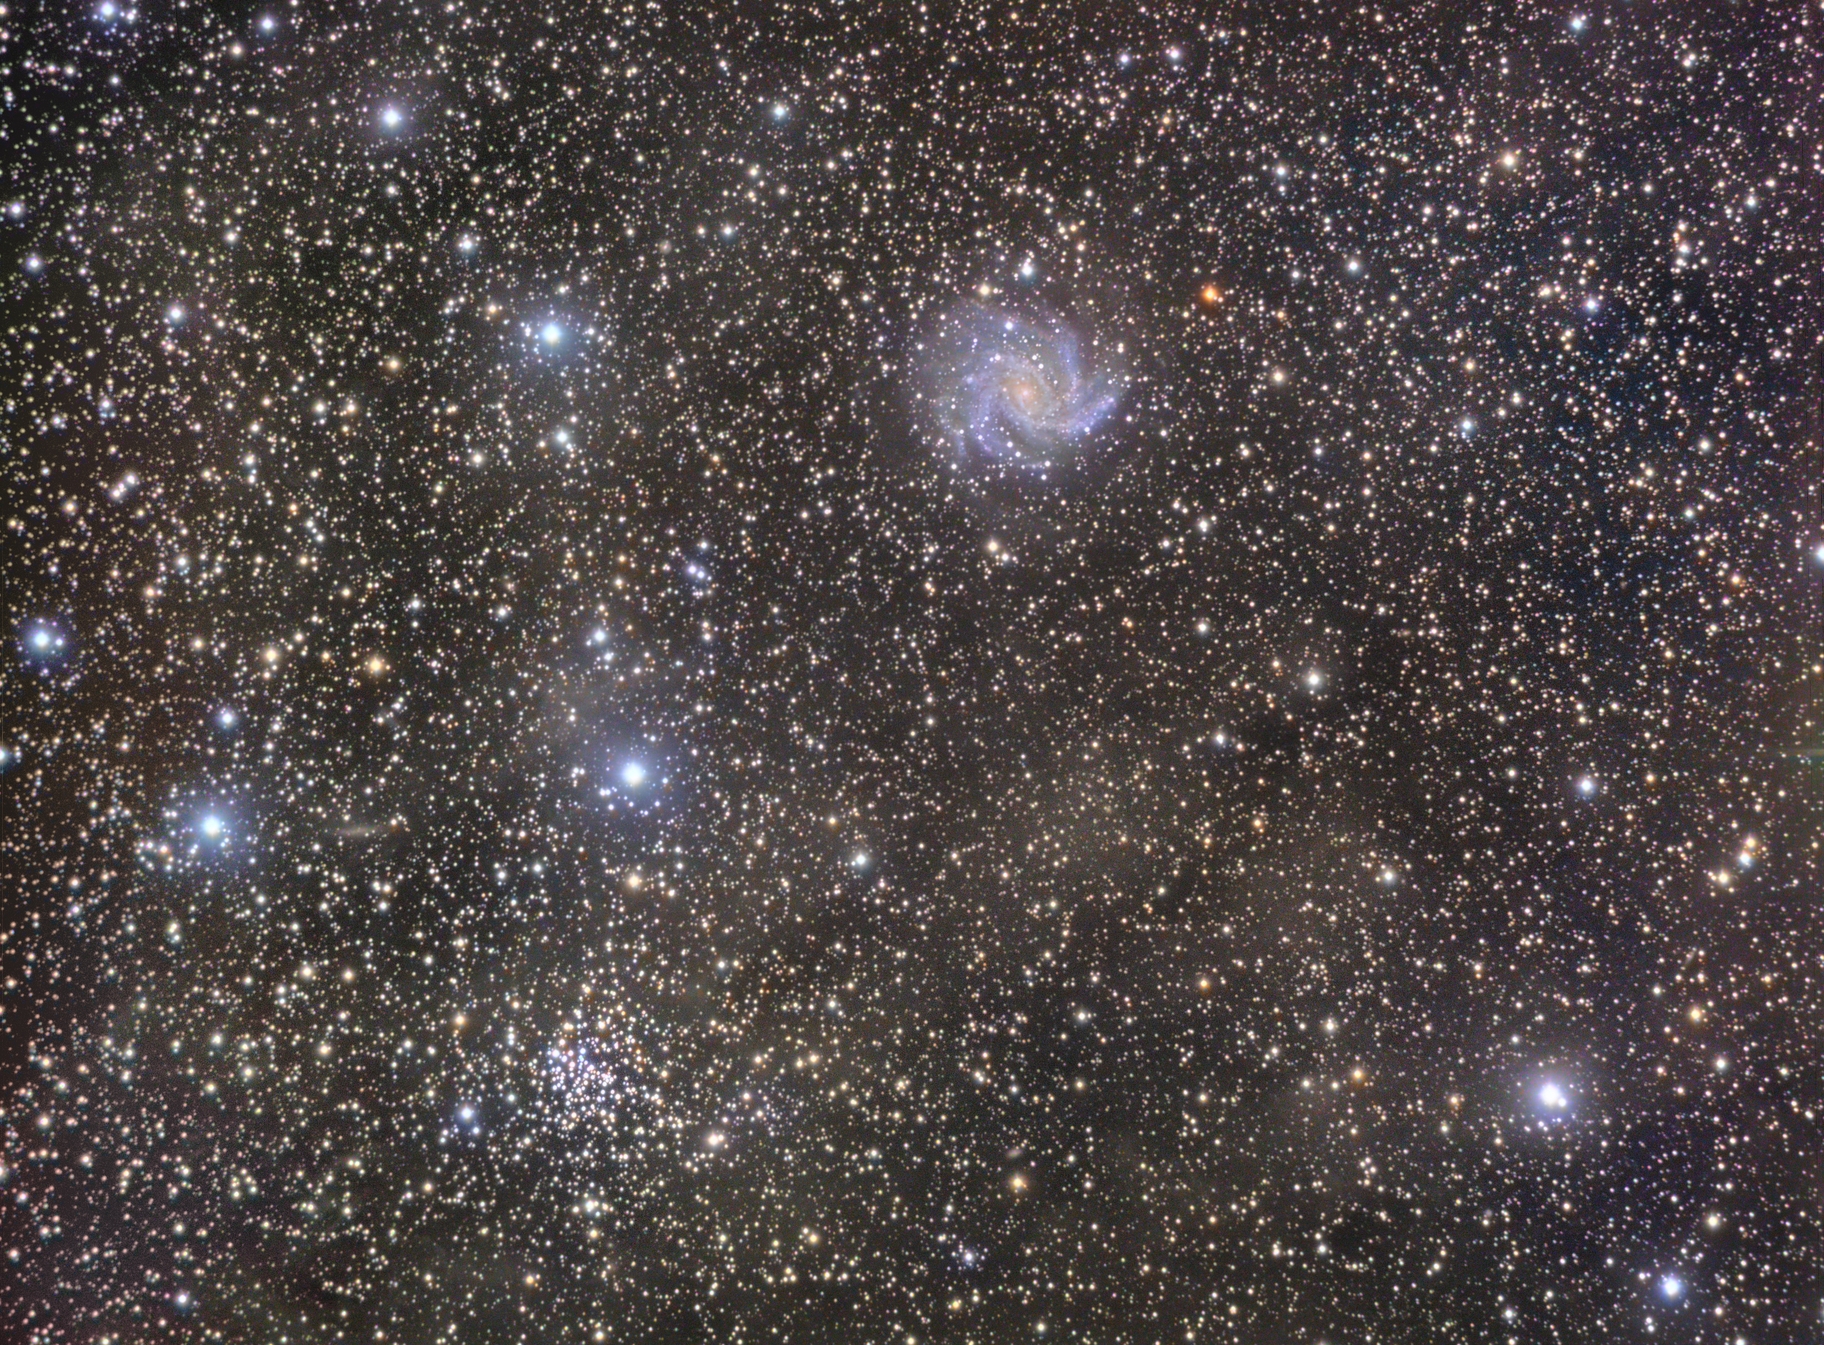
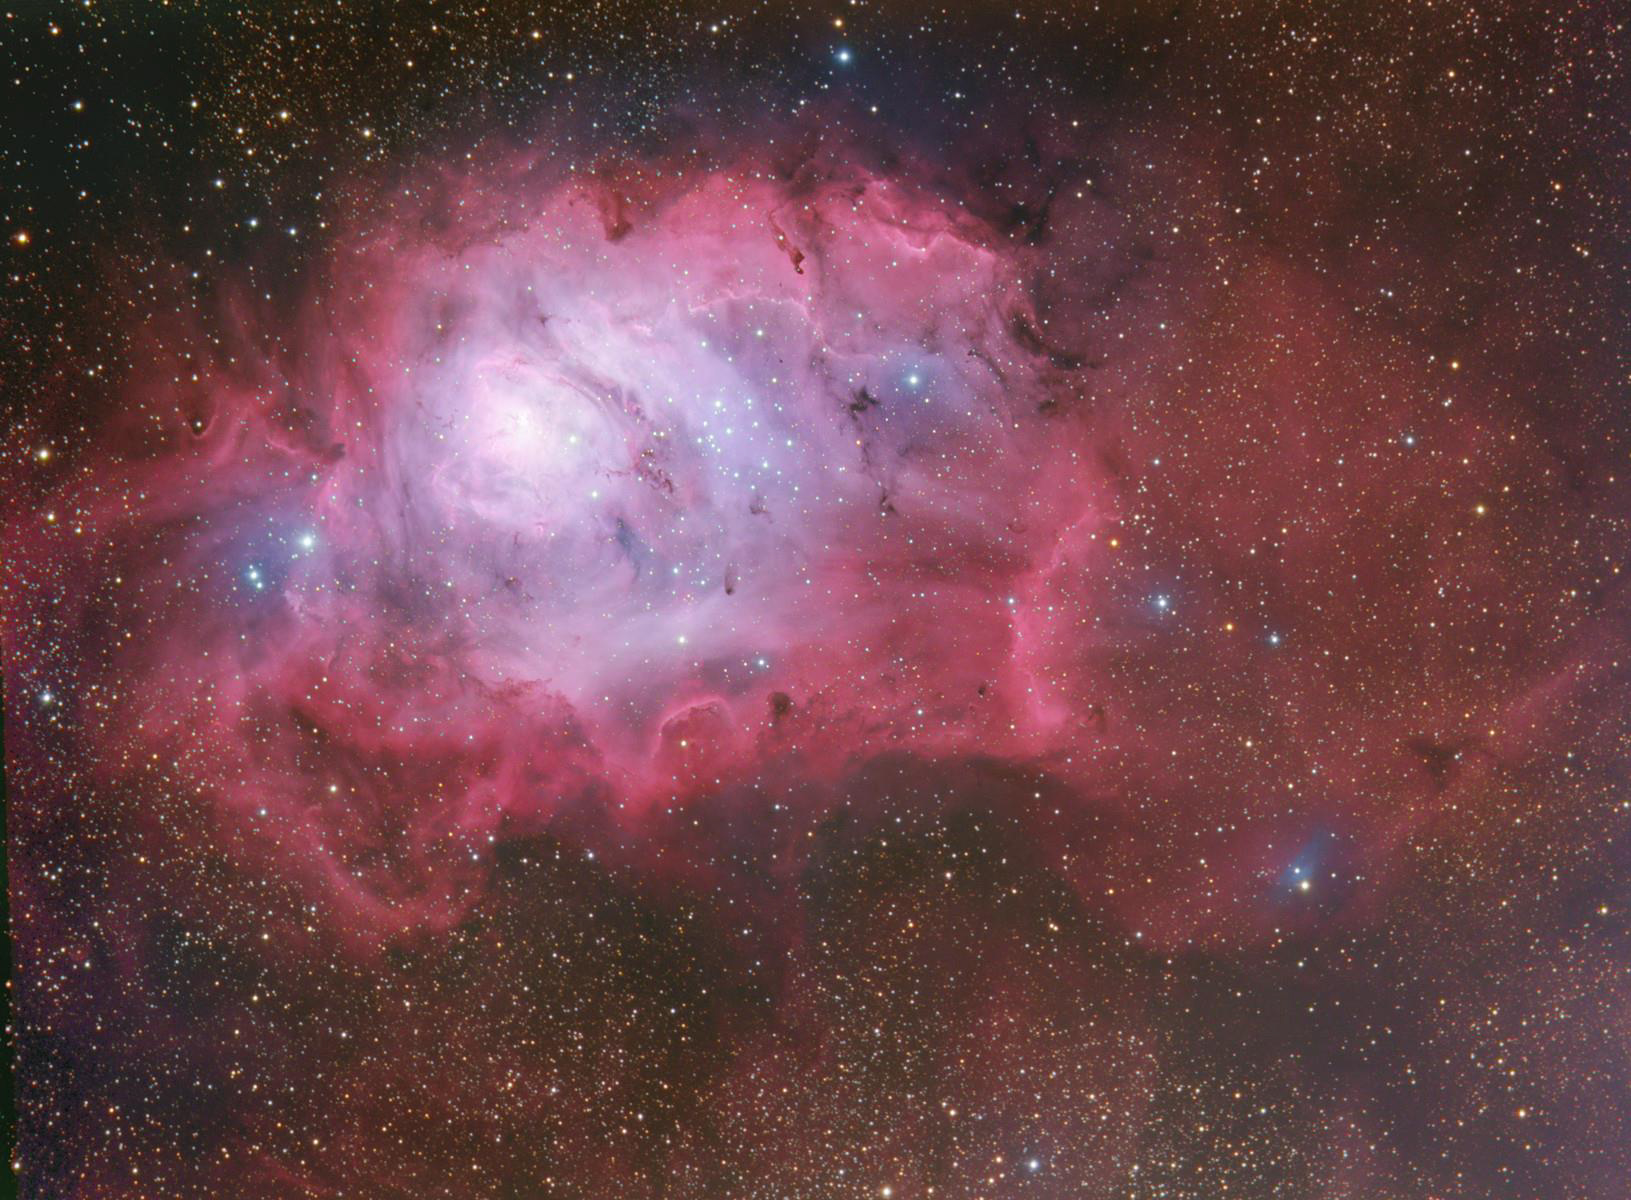
Some Image taken with AST8300b


I’ve been a dedicated to Squarespace fan for 20 years. Love the product, people and company.